Is your car leaving messy oil spots on your driveway? This is often caused by a worn-out engine part. You might need a rocker cover gasket repair. Do not worry! This task is much easier than it sounds. You can often do it yourself to save money. We will walk you through the process step by step. We want to help you keep your engine running smooth and clean.
What Is a Rocker Cover Gasket?
The rocker cover sits on top of your engine. It keeps oil inside so your engine parts stay lubricated. The gasket is a soft seal between the cover and the engine. Over time, heat makes this seal hard and brittle. When it gets hard, it can no longer stop oil from leaking out. This is why you need a rocker cover gasket repair.
Signs You Need a Repair
How do you know it is time for a rocker cover gasket repair? First, look for oil spots under your car. You might also smell burning oil while driving. This happens when oil leaks onto hot engine parts. Sometimes, you might see oil around the spark plugs. Keeping an eye on these signs helps you catch leaks early before they become big, expensive problems.
Safety First Before You Start
Before you start any rocker cover gasket repair, safety is the most important rule. Always make sure the engine is completely cool. Working on a hot engine can cause bad burns. Also, wear safety glasses to keep oil out of your eyes. Keep your workspace clean and organized. A safe job is always a much better and faster job.
Gather Your Essential Tools
You do not need fancy tools for a rocker cover gasket repair. You will need a basic socket set and a wrench. A flat-head screwdriver or a plastic scraper is also very helpful. Get a clean rag to wipe away old oil and grime. If you have a torque wrench, that is even better. Having everything ready saves you time and frustration.
Preparing the Engine Area
Start by disconnecting the battery for safety. Move any wires or hoses that are in your way. Take a picture with your phone before you remove anything. This helps you remember where every wire goes later. Keeping things clean is vital for a successful rocker cover gasket repair. Wipe off dirt before opening the engine.
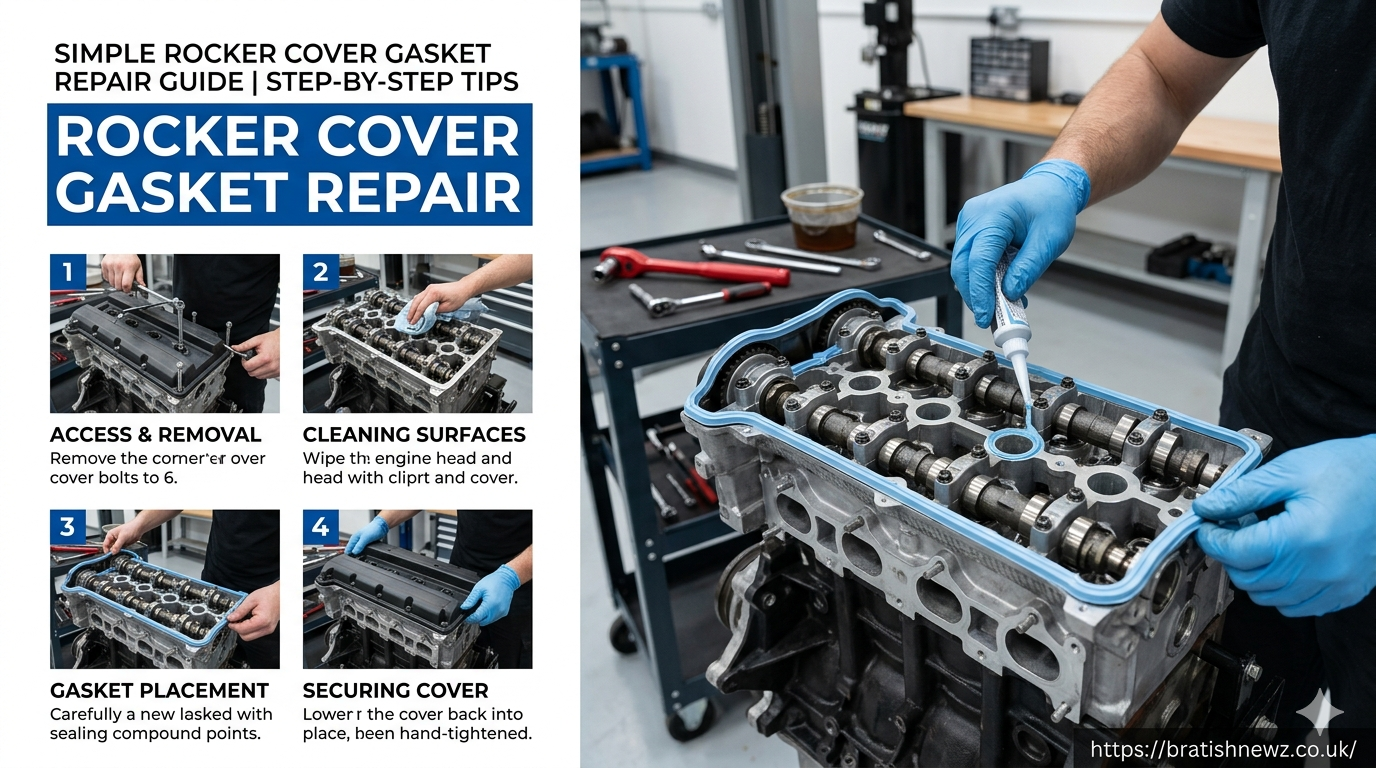
Removing the Old Rocker Cover
Gently loosen the bolts holding the cover in place. Work in a crisscross pattern to keep things even. Carefully lift the cover off the engine. Be very gentle so you do not damage any parts. If it feels stuck, do not force it. Tap it lightly to help it come loose. This is a key step in a rocker cover gasket repair.
Cleaning the Sealing Surfaces
This is the most important part of a rocker cover gasket repair. Use a scraper to remove the old, stuck-on gasket material. Be very careful not to scratch the metal surfaces. If you scratch the metal, it may continue to leak even with a new seal. Wipe everything clean with a lint-free rag. A perfectly clean surface ensures a great seal.
Installing the New Gasket
Take your new gasket out of the package. Match it up with the old one to be sure it is correct. Place it carefully onto the cover or the engine block. Make sure it fits snugly in the groove. Do not use too much extra sealant unless the manual says so. A clean, dry installation is best for a rocker cover gasket repair.
Putting Everything Back Together
Put the rocker cover back onto the engine block. Tighten the bolts by hand at first to ensure they are straight. Then, use your wrench to tighten them fully. Use a star pattern to keep the pressure equal across the cover. Do not overtighten the bolts, as this can crack the cover. This makes your rocker cover gasket repair last a long time.
Checking for New Leaks
Once everything is back, connect the battery. Start your engine and let it run for a few minutes. Watch closely around the edges of the cover. If you see no oil, your rocker cover gasket repair was a success! If you see a tiny leak, turn the engine off and check the bolts again. Small adjustments are totally normal.
Regular Maintenance Tips
To keep your engine happy, check for oil leaks often. Clean your engine bay to help you spot new leaks quickly. Using good quality oil also helps keep your gaskets soft. Remember that a simple rocker cover gasket repair can save your engine from bigger trouble. Stay proactive, and your car will thank you with many more miles.
Frequently Asked Questions (FAQs)
1. Is a rocker cover gasket repair hard for a beginner?
No, it is a great beginner project! If you take your time, it is very manageable.
2. How long does a rocker cover gasket repair usually take?
For most cars, it takes about one to two hours to complete the job properly.
3. Do I need special tools for a rocker cover gasket repair?
You only need basic hand tools like a socket set and a wrench to finish the job.
4. Can I reuse the old gasket during a repair?
It is always best to use a brand-new gasket to ensure a leak-free seal every time.
5. What happens if I do not perform a rocker cover gasket repair?
A leak can waste oil and cause a bad smell. Over time, it can damage other engine parts.
6. Should I use liquid gasket sealant?
Only use it if your car’s manual specifically says to. Usually, the rubber gasket does the work alone.
Conclusion
Doing a rocker cover gasket repair is a rewarding way to take control of your car’s health. By tackling this yourself, you not only save on expensive shop labor costs but also gain a deeper understanding of how your engine works. Remember, the secret to a perfect seal is patience, cleanliness, and taking your time during the cleaning phase. Once you finish your rocker cover gasket repair, you will enjoy a cleaner engine bay, no more burning oil smells, and the satisfaction of a job well done. If you feel stuck, always refer back to your car’s specific service manual for extra help. You have the tools and the knowledge to keep your vehicle running in top shape for years to come. Now, grab your tools and get started!